

Hints
Stuck on a puzzle in What Lies Underground?
Looking for a walkthrough?
The text feedback on screen gives hints for some of the puzzles.
Have you collected all of the items you need to complete a puzzle?
Have you searched everywhere?
A number of puzzles can be solved independently, in any order, but certain puzzles require others to be solved first.
If you are completely stuck then have a look at the hints below.
Entering The House
Take a look at the items.
If you haven't yet looked at the envelope in your inventory select it and use the magnifying glass icon to read the letter.
Return to the inventory screen and you will see a key.
Use the key on the lock of the mailbox.
Tap on the keypad to take a closer look.
You need the code from the top right corner of the letter in your inventory.
Enter the digits 2, 9, 0, 9 on the keypad and then press the enter key. (The button at the bottom right)
Exit the mailbox screens... You can now enter the house.
4 Dial Combination Box

25 Handled Drawer Puzzle
Many of the drawers with handles you need to turn are marked with a cross but not quite all of them.
The number to the left of a row is the number in that row that are turned to a vertical position.
Column 1: Handle in row 2, 4 and 5.
Column 2: Handle in every row.
Column 3: No handles.
Column 4: Handle in row 2, 3 and 4.
Column 5: Handle in row 1, 2, 3 and 4.
Ship Picture Puzzle
You will need a clue to find the names and the sequence of sails to press.
You will also need information to identify what the sails look like.
The poem describes the sequence of sails that need to be pressed.
Turn on the 3rd small, black, switch.
After solving the 25 handled drawer puzzle in the study, look in the middle drawer and put the switch in the down position to close the circuit.
Follow the sequence of sails in the poem written on the "Old Looking Piece Of Paper" collected from the top right hand drawer of the chest of drawers in the lounge.
The sequence is: Flying Jib, Main Mast, Fore Course, Ensign, Main Top Sail, Mizzen Mast. These correspond to the sails and masts in "A Guide To Sails And Rigging" on the bookshelf: 1, 8, 7, 14, 10 and 11
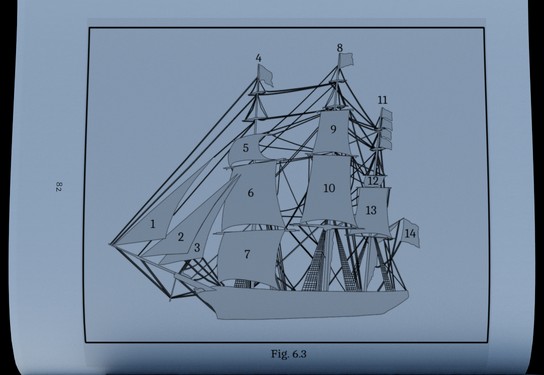
(The LEDs on the right will light up from top to bottom when the sequence is correct. If you get any wrong you must press further sails until the lights are reset.)
When the puzzle is solved look around to find out what happened.
Locked Door At Top Of Stairs (door on the left)
In the upstairs bedroom, open the wardrobe/closet.
The jacket hanging inside has three pockets, a left and right pocket near the bottom and an internal pocket higher up.
Tap on each of the three pockets for the key and different comments.
Go to the study downstairs.
Use the key on the top drawer of the desk, to the right of the black chair.
After unlocking it, tap on the drawer to open it and see the contents.
Pick up the key and the other item. This key can be used to open the door at the top of the stairs on the left.
Sliding Latch Puzzle Box
Bottom right, middle left, top left, middle right, bottom right, bottom left, middle left and top right.
Direction Puzzle Box
It will be listed as Unusual Looking Device in your inventory once collected.
Match the sequence of directions in the text to the dials on the box NG, PT, 178 and 23.
PT - West,
178 - North.
23 - West.
Gold Leaf Box (Round Box)
The Ceramic Disc is hidden in the 4 dial combination box.
The Ceramic Hoop is located somehwere in the closet/cupboard at the top of the stairs.
(Solve The Direction Puzzle Box for the key to this small storage room.)
The Chest
The Toilet Cistern
Is there something beneath the water?
How can I stop the water refilling when I flush?
Collect the rubber gloves from under the sink in the kitchen.
Using the gloves remove the blockage in the cistern.
Flush the toilet again.
Collect a wire coathanger from the wardrobe in the bedroom.
You must have the wirecutters in your inventory. (These are located in the metal compartment inside the bureau.)
Use the coathanger on the flush mechanism.
Turn off the water supply in the kitchen, under the sink.
Flush the toilet again.
Move to the close-up view and remove the metal plate.
Collect the item that falls from behind the plate.
The Shed
The Animal Box
Collect the wooden newt from the metal compartment inside the bureau.
Collect the hedgehog from the puzzle box on the table opposite the bed in the room at the top of the stairs.
Collect the wooden bird from the toilet cistern.
Collect the dragonfly from inside the chest.
Insert all of the wooden pieces into the box. Tap one of the sections between the animals to rotate the lid. Insert the winding key into the hole on the side of the box.
(The winding key is hidden in the birdbox. You need the ladder to reach the birdbox. You need to have read the bird book to open the birdbox.)
Gramophone Puzzle
(The chimes can be found in the tree near the birdbox. The green stick is holding the slide together, you must replace it with the nut and bolt. The frog will be available when you have solved another puzzle.)
Opening The Manhole Cover
(The round key is hidden in the compartment of the device where you replaced the fuse earlier.)
Finding The Elusive “Missing” Achievement
In the box room upstairs, switch off the device at the wall.
Open the small compartment.
Select the rubber gloves.
Then tap on the old fuse.
When you have the nut and bolt, swap it for the green stick wedged in the slide.
Then tighten the bolt with the spanner / monkey wrench, to receive the achievement. Dun dun dun! (Imaginary dramatic music)
Now you know how to get the missing achievement you can sleep soundly at night.
Easter Eggs (Hidden Odd Bits And Pieces To Try) - Revealed August 2025
After removing the 4 battens around the shed window, select the rubber gloves and using them, tap the shed window pane (while it's still in the window) to remove it. You will get a different comment to the regular one.
While still using the gloves collect the ladder for a different comment to when you collect it without gloves.
Once the ladder is collected, tap inside the shed where the window used to be for a comment about what else remains in there. (Non collectable).